Meisanarts !
I want to thank everyone who joined the giveaway, I got so many sweet reactions from you guys. You are the best!
Be sure to follow my account, I will host event like these in the future.
Love, Eve
Artwork
Meisanarts !
I want to thank everyone who joined the giveaway, I got so many sweet reactions from you guys. You are the best!
Be sure to follow my account, I will host event like these in the future.
Love, Eve
Hey you!
Last two days of the giveway! This is you last chance to win the Newt Scamandert print 🙂
I will ship worldwide 🙂
How do enter the give away? It is fairly simple, just follow these steps:
I will announce the winner on Friday 19th of May!
Hello amazing peeps!
In order to celebrate me finally being able to print my art, I am going to host a give away of my most favourited piece: Newt Scamander of Fantastic Beast!
How do enter the give away? It is fairly simple, just follow these steps:
I will announce the winner on my Instagram in ten days 🙂
 Good luck to you all!
Love, Eve.
Greetings fellow painters!
This tutorial will be all about brushes. How to get them, how to install them and, most important, how to create your own perfect brush, fitting your style.
I currently use the most recent Photoshop version available, Photoshop CC, but these tips and tricks should work on most versions of Photoshop.
Get your brushes
The standard brush pack in Photoshop is great for beginning digital artists who want to get the hang of using virtual brushes instead of real ones. However, after a while, I wanted to personalise my art style more, and in my opinion these standard brushes weren’t getting me the textured looks I wanted to create. So I started to look for different brushes. Now, you could just google them, but here are some of my favourite brushpacks.
Daroz Deviantart – Mar-ka Deviantart – DanLuVisiArt Deviantart – fox-orion Deviantart –Cubebrush – Ross Tran – Loish
Deviantart offers free brush packs but be sure to follow the policy of the artist that made them. Cubebrush, Ross Trann and Loish offer a great variety of brushes but ask a small charge in return. If you are a beginning digital artist, I would advise you would dowload a free brush pack. When you are a more advanced painter, consider a brush pack of the artist that inspires you most (and yes, that means I own all three brush packs).
Install the brushes
Easy peasy, but I will walk you through it anyway. Photoshop brushes are saved as .abr files. Download the pack you want to install and open Photoshop. Open your brush preset picker as shown below.
Then make sure you open the menu on the top right of the brush preset picker and choose the ‘load brushes’ option.
Now you can pick your downloaded brushset and add them to your collection!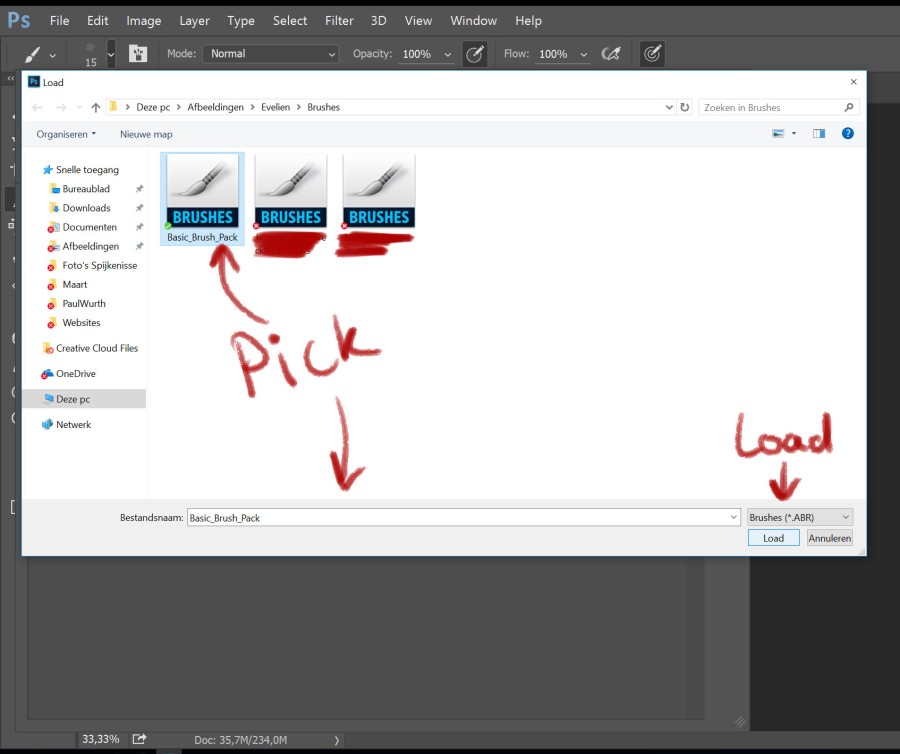
Told you it was easy.
Customise the perfect brush
Ah well, perfection doesn not exist, but you can get pretty close. I just recently discovered this trick and it finally made me realise how the digital masters got all these cool brushes I could never find. It is because they blend two brushes into one and BAM! New cool brush. I will show you how to do this.
First of all, pick your standard brush. For this example I used a simple round brush you can find in all versions of Photoshop. A simple round bursh will give your drawing a smooth and refined look.
 Open the Brush menu, which shows you many options to alter brushes. I highlighted my chosen brush.
 First thing I usually adjust is the maximum diameter of the brush, found under shape dynamics: should it end in a fine line or do you want a thick stroke? Demonstrated here:

 This wil have its effect on a painting; with a small minimum diameter you can paint details, with a large diameter the first strokes will go much faster.
Now, to add texture to a brush you can simply click on the texture option; however, I found the following method much more pleasing: click on dual brush and choose a rough brush. This will blend the two brushes together, thus creating a new brush! Now your options are endless; create whatever brush you like with your own presets and define you artstyle, stand out!
I hope you found this tutorial usefull! Comment below if you have any questions left or you have a suggestion of what my next tutorial should be!
Love, Eve
Hi there fellow artists!
I promised new tutorials of how to paint digitally, so here’s a quick step by step of my colouring process. I used a reference photo of Kiersey Clemons on this one. 
First, I paint a base, a value drawing that contains most of the details, resembling the refence picture. Usually this value painting is either painted in blue or green hues, because I prefer my shadowcolours in a cool tone, but you can choose whichever colour you like. You should end up with something like this:

As you may have noticed the dark areas are more detailed than the light spots in the drawing. I do this on purpose, because during the colouring process I add more lights than shadows. Make sure you merge the whole painting to one layer.
The next step is to create a new layer and set it to soft light, as seen in the picture below:
Paint on top of your value base with bright colours, using a soft brush: 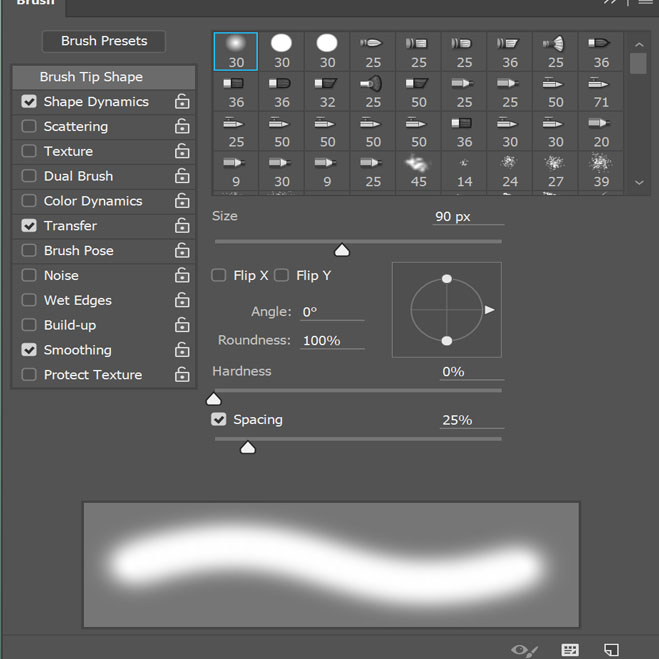
This way, you can gradually add colour to your base. Make sure the colours of the figure do no ‘bleed’ to much into the background, this can make the whole look messy. I ended up with a slighly coloured base like this, laying down my basic colours:

Looks like something already, doesn’t it? Now, for your next step, a very important one, you should choose direction: which colours should be emphasized, which colours not? Check out a colourwheel before doing this:
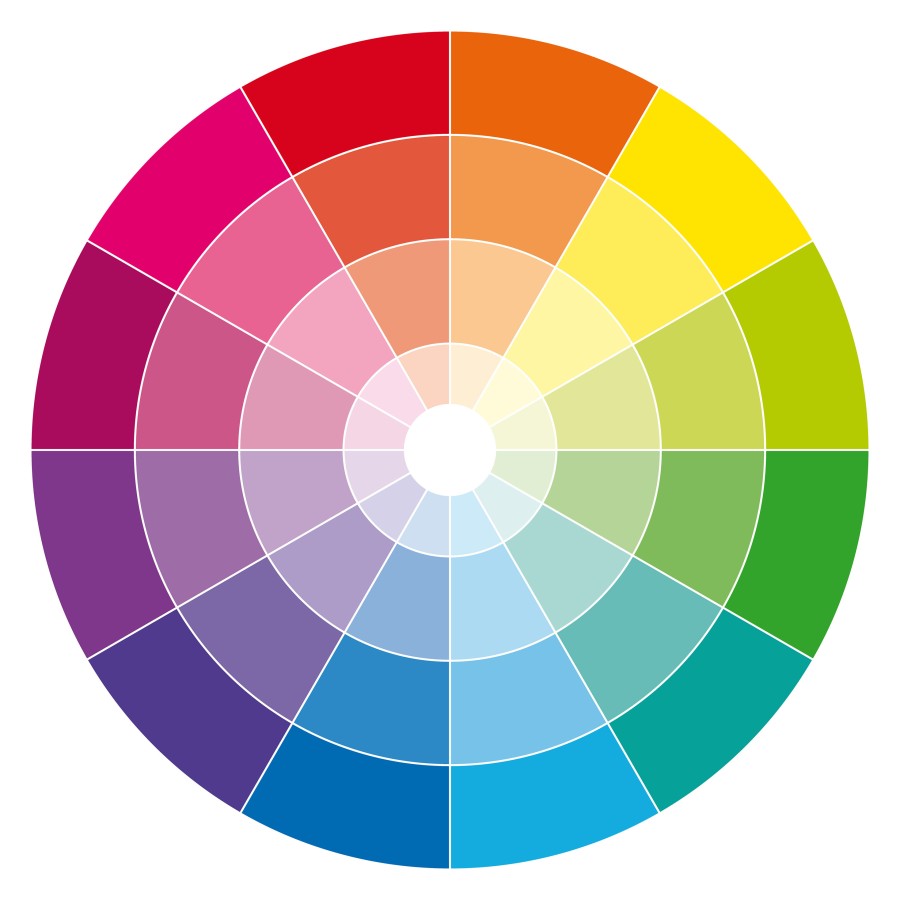
I like to use complementary colours – colours who are on opposite sides of the wheel; this makes an artwork stand out more.

Her skin should be a red, orange tone whereas I know her shirt and short are blue, so I should emphasize on these colours. Luckily, they are complemantary, as seen above.
I bring out the colours even more by using Vibrance, an option in Photoshop, to be recognized by these icons:
I do not play with the saturation, solely the vibrance; in my opinion a drawing loses the values when one oversaturates.

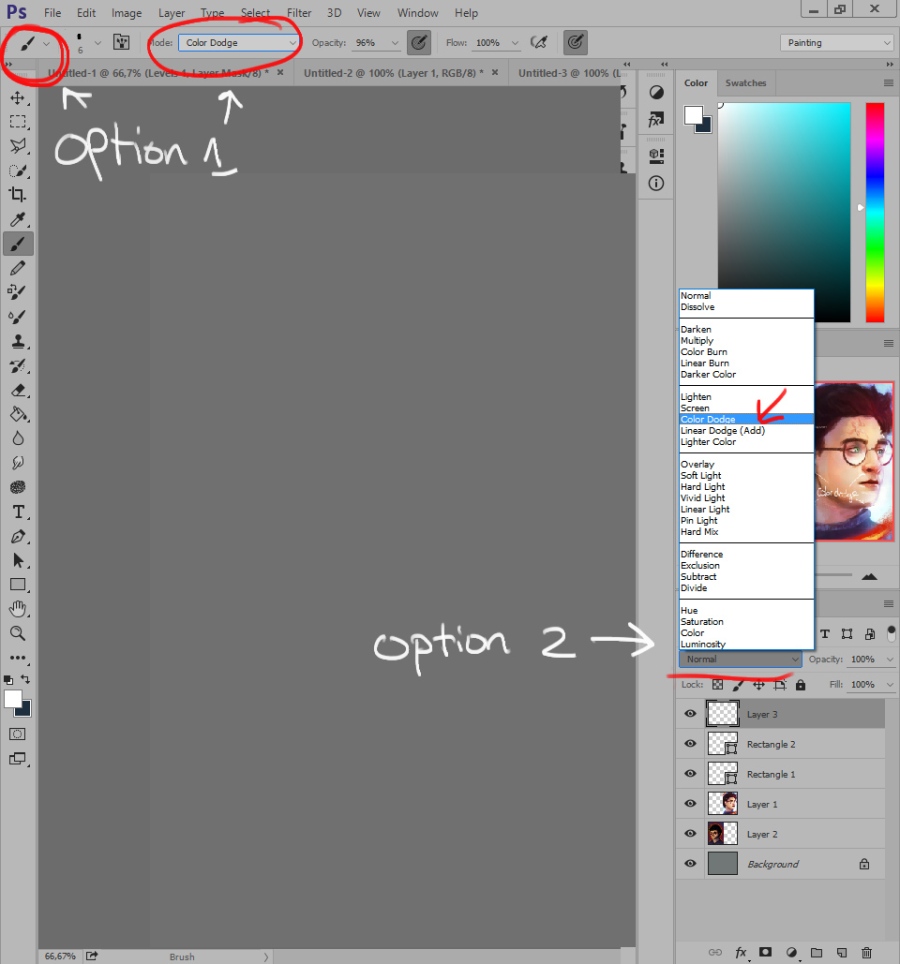
At this stage I also play with colour dodge a lot, which brightens the colours even more. I already made a tutorial about colour dodge, you can view it here: Colour dodge.
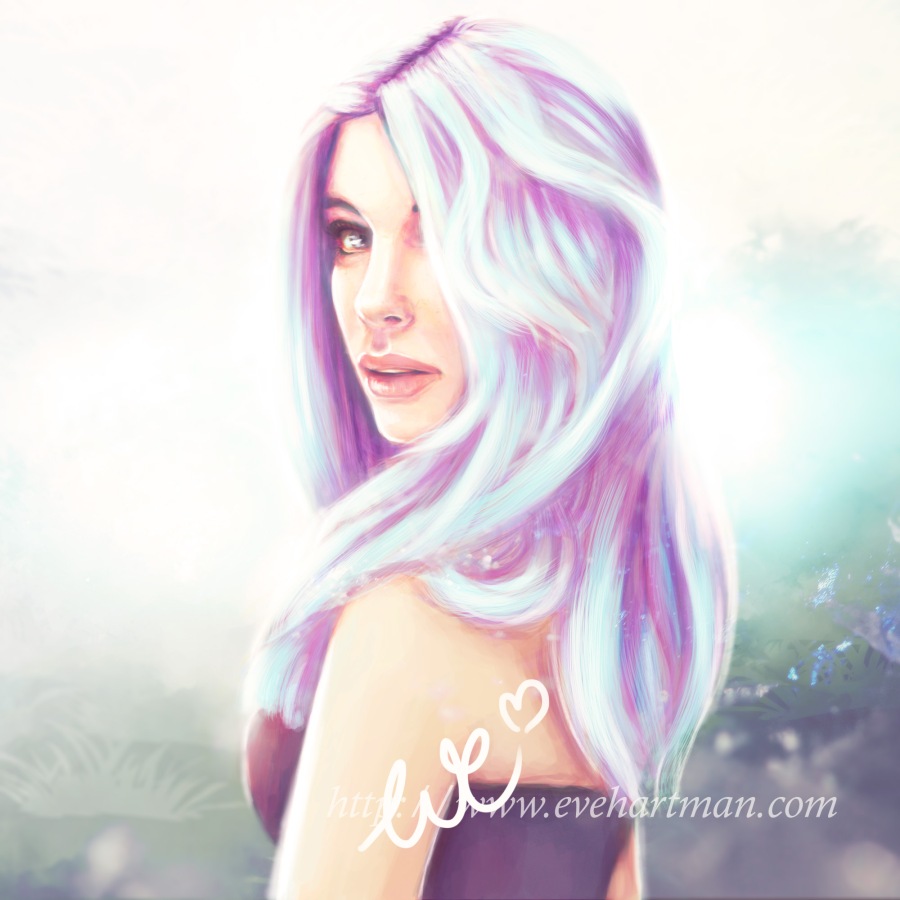
Eventually, my drawing looks like this:
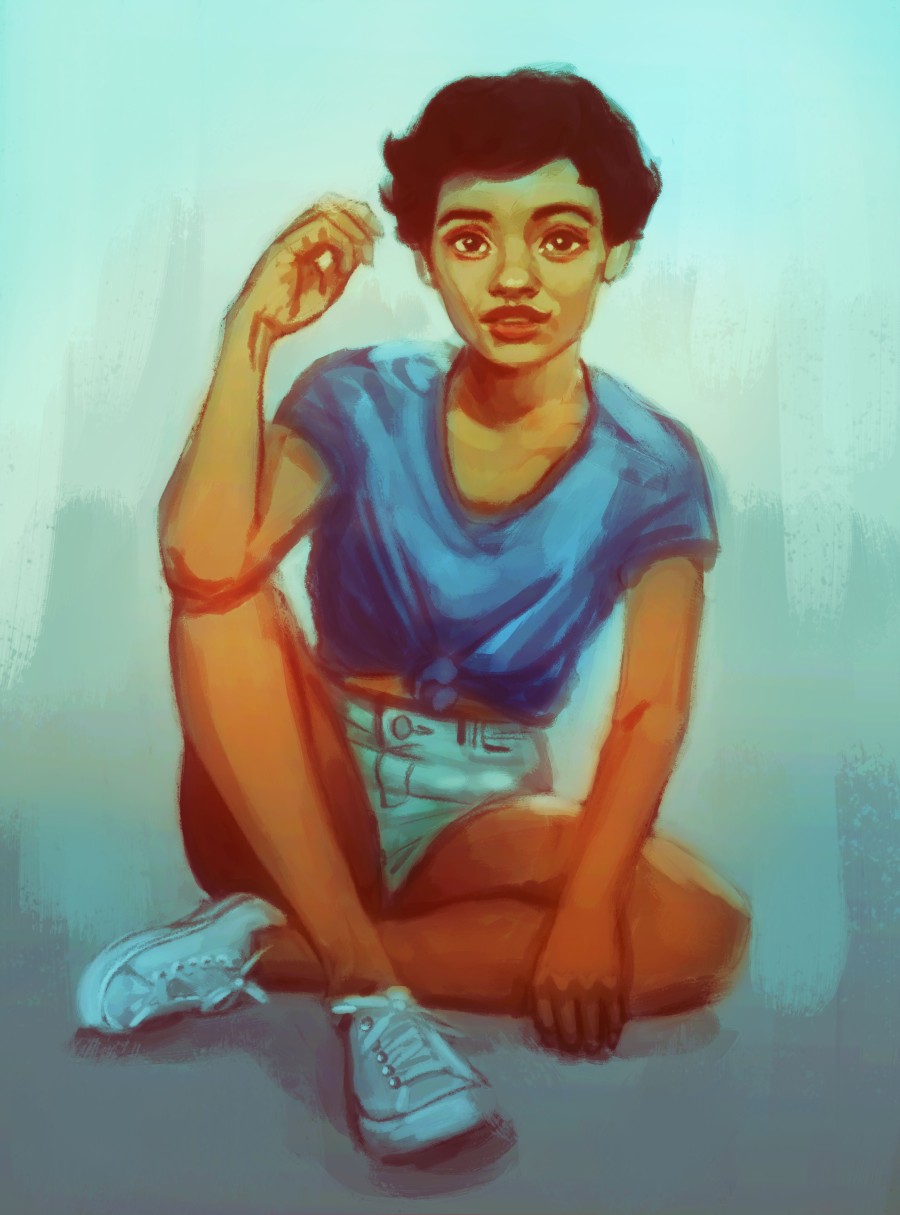
A harmonic colour play between the warm red tones of the skin and the cool contrast of the clothing and the background. As you might notice, in the artwork the shawdows are a cool tone, and the midtones and lights a warm tone. Again, complementary. It is important stuff, guys.
Now comes the fun bit: keep playing and experimenting with it! I often add more colour layers in soft light and colour dodge, and use the vibrance tool even more. Add textures to backgrounds to make them more interesting and strenghten the lights and shadows. This was my end result:

Her red lips became a focal point because they set off against the blue tones in the background, the blueish shadows on her legs bring up the attention to the more orange arms, face. The bottom of the drawing is of a blue hue, the top a yellow one. All tips and tricks to emphasize her face.
I hope you find this tutorial usefull! Please, if you have any questions, do not hesitate to ask 😉
Love, Eve
Hey guys!
First artist feauture on my blog, Ross Tran! In this post I will tell you more about this amazing digital artist, his artwork and why he inspires me so much. I will also elaborate a bit about color dodging in Photoshop, its importance and how it affected my colouring methods.
Ross Tran, better known as Ross Draws, is a twenty something creative young’un from the U.S.A. I came across his channel on Youtube whilst searching for tutorials on digital drawing and I was pleasently surprised by the videos I found there. Usually, his recordings are about 5 tot 7 minutes long (excellent for people with a short attention span) and show how he makes his digital artwork. Furthermore, Ross often highlights one aspect of the artprocess; whether it be composing composition, neat texture tricks or how to coordinate colours. And he always, always uses the color dodge tool.
Here is an example of one of his tutorials:
Color dodge. Ah yes, how this changed my way of working in Photoshop. Let me show you:
First of all, how does one obtain this elusive skill? The figure below should provide some clarity. You can either set your brush mode to color dodge, or apply it to a seperate layer. Use both for maximum power. Congratulations, you can now color dodge!
Here are two examples of my artwork. The one on the left was made in 2013, the one on the right was made this January, both are made in Photoshop.

Aside from the obvious style change and anatomy improvement, the colour composition in the image on the right is far more pleasant than the left drawing. All thanks to color dodge. This technique allows one to create more depth in composition as well as a greater variety in colours. It also gives you the abilty to change warm tones in a drawing to cool tones. Furthermore, it is so easy to use! Just have fun with it, and soon enough you will be a color dodge expert.

Ross explains the use of this tool in several of his videos, and I would highly recommend watching them all! His tutorials are very instructive for the beginning artist as well as being entertaining (I personally have a soft spot for Milo) for the more experienced sketchers. Mr. Trans uplifting spirit will leave your mood as brightened as your artwork will be after color dodging.
And, to end in the words of this digital master: Everyday is a color dodge day!
You can find his sites here:
https://www.youtube.com/channel/UCLEVrhumRsK67JkP3G4w5cQ
https://www.instagram.com/rossdraws/
https://www.patreon.com/Rossdraws
https://www.facebook.com/Rossdraws/
Love, Eve
Hang in there guys, I will update my site soon!

Lately I have been working my butt off; not only at my regular job, but also with my artwork. I felt I got stuck at a certain level and I wasn’t showing any progress whatsoever. It is quite the unsatisfied feeling, frustating even. Until I rediscovered an old artfolder on my laptop – I think it dates back to 2012? – and started comparing those drawing to my recent drawings.
My oh my.
Both drawings above show Hermione Granger, portrayed by Emma Watson in the Harry Potter movies . The one on the left was made in 2012, the one on the right I finished this June. Apparently, I got a better sense of facial proportions, facial angles, background, skin color, lights and shadows and so on…
It was a relieve to notice these major changes. It means that my progress is slow, but there is progress. And then I got an idea: why not analyse how I my progress was influenced over the years and make a “how to improve your artwork” blogseries on my site? With tutorials, inspirational artists, reviews and video’s? So you guys can perhaps learn from my mistakes?
This is exactly what I will be doing for the next couple of weeks. Be sure to check in to learn how to improve your own artwork!
Love, Eve
Just a short and quick update!
First of all, the image above is my new piece, I hope you like it! First time I actually put some effort into a background, and I think I should practice on backgrounds more often. It actually enhances the drawing 🙂
Second, as of today I got a Deviantart account: Devianart. If you are not familiar with Deviantart, I highly suggest you check it out! It is an amazing site that supports artists from all ovr the globe by bringing them together. Here you can find great art pieces, inspiration for new works and resources such as textures and stock photo’s. The stock photo for the image above is from Mirish, she has great stock photo’s in her gallery.
Will post more art soon, I promise!
Love, Eve
Edit: Made a Tumblr account as well: Tumblr
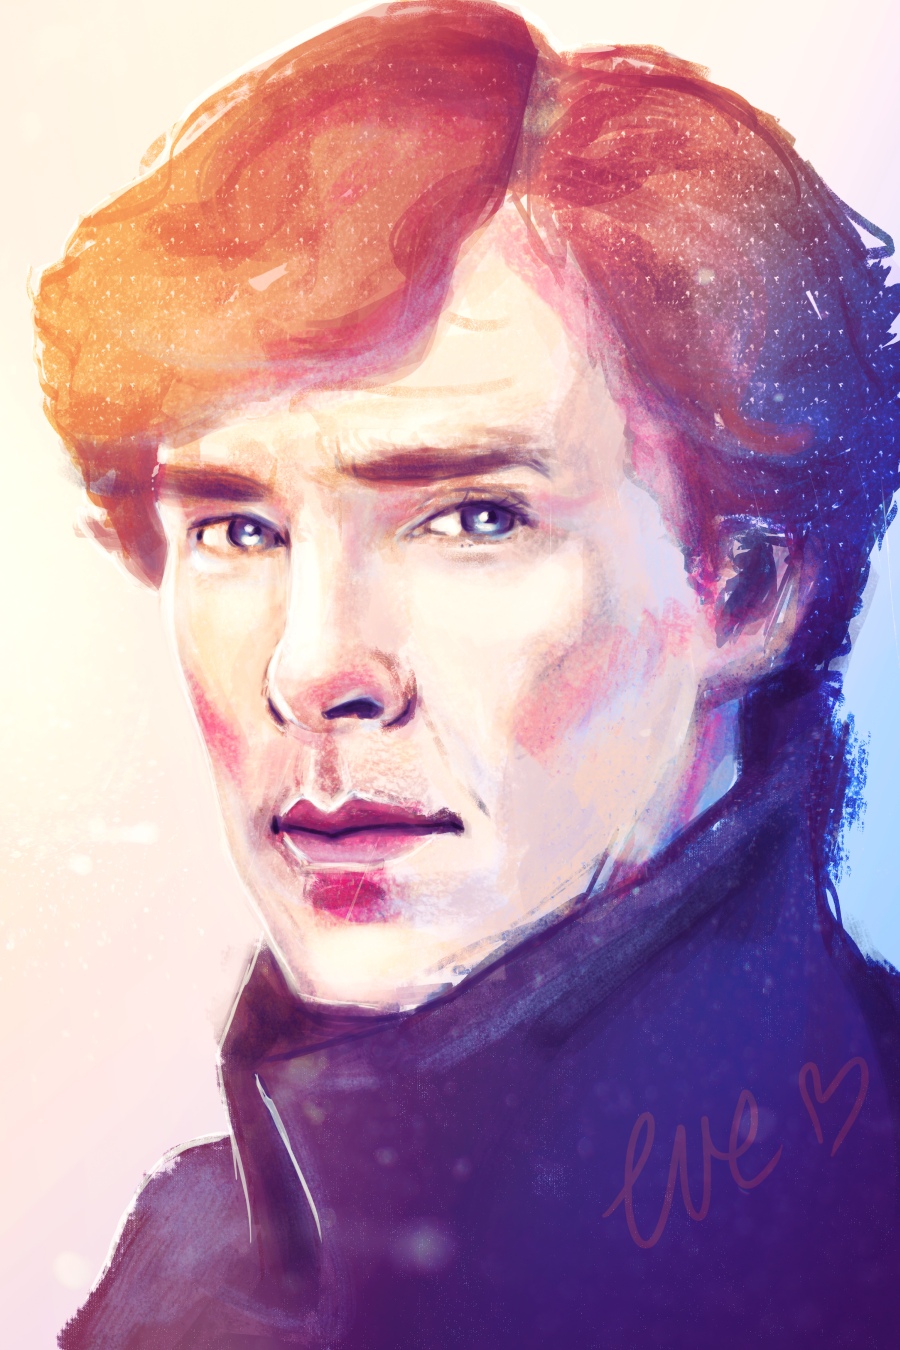
I recently bought an anual Adobe license, which provides a variety of programmmes for painting/editing. This portrait of Benedict Cumberbatch as Sherlock Holmes is one of the first drawings made in Photoshop CC (I worked with Photoshop CS4 before CC). Although roughly the same, I noticed that the CC version is easier in use. And my Wacom tablet somehow works faster, which is a big pro!
I also started working with Artrage, a digital art programme that actually uses traditional media. It works phenomenal! I will soon post a review, or perhaps a review video, about this programme.
New artprogrammes mean more art, so be sure to check my site regularly, as I will update new art soon!
Love, Eve
